
Key takeaways
- Plugging a sidewall, shoulder, bead, or visible bulge.
- Using a plug on a puncture larger than the kit or tire manufacturer allows.
- Leaving the screw or nail in place and trying to plug around it.
- Using too much force with the reaming tool or enlarging the channel excessively.
- Combining an incompatible liquid sealant with a plug. Sealants can complicate later inspection and may damage pressure-monitoring sensors.
- Inflating by the maximum sidewall number instead of the vehicle’s recommended pressure.
- Skipping the soapy-water test or assuming a repair is sound because it feels firm.
- Treating a roadside plug as a permanent repair or driving at normal highway speed before inspection.
A tire plug can get you back on the road quickly when a small nail or screw punctures the tread, but a careless repair can leak, pull out, damage the tire’s internal cords, or fail at highway speed. A plug is generally a temporary, roadside fix—not the same as a professional internal patch-and-plug repair. Before starting, read the tire and repair-kit instructions, work on a level surface, and use the plug only for a small puncture in the central tread area. Never plug a sidewall or shoulder.
This guide explains how to repair a tire puncture with plugs in 2026, including the tools you need, how to locate the leak, and when the tire should be professionally repaired or replaced.
As an Amazon Associate we earn from qualifying purchases at no extra cost to you. Product prices and availability are accurate as of the date shown and are subject to change.
What You Need
| Item | Why | Optional? |
|---|---|---|
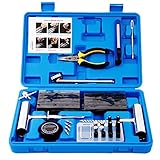
| Tire plug kit | Most kits include insertion and reaming tools, rubber plugs, and sometimes pliers, a knife, lubricant, or sealant. | No |
| Air compressor or 12-volt inflator | Reinflates the tire so you can check whether the repair holds. Choose one rated for your vehicle’s tire size and a 12-volt model drawing roughly 10 to 15 amps if using a vehicle outlet. | No |
| Tire-pressure gauge | Confirms the tire reaches the pressure listed on the driver’s doorjamb label, not the maximum pressure molded into the sidewall. | No |
| Pliers or diagonal cutters | Removes nails and screws and trims excess plug material. | No, if included in the kit |
| Soapy water in a spray bottle | Reveals escaping air through bubbles. | No |
| Gloves and eye protection | Protects your hands from sharp metal and your eyes from debris or tools under pressure. | Gloves are optional; eye protection is strongly recommended |
| Work light, warning triangles, and wheel chocks | Improves visibility and helps keep you safe beside the road. | Yes, but recommended |
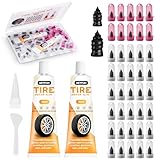
For reference, the AUTOWN Flat Tire Repair Kit 68pcs is commonly listed around $15 to $25, while the MetFun 40 PCS Quick Fix Screw-in Tire Plug Kit is commonly listed around $6 to $10. Prices can change, and a larger kit does not necessarily make a repair safer. Choose a kit with sturdy, comfortable handles and plugs intended for tubeless passenger-vehicle tires.
Step-by-Step
-
Park safely and inspect the tire (5–10 minutes)
Move to a flat, stable area away from traffic. Turn on your hazard lights, set the parking brake, place the transmission in Park or in gear, and chock a wheel if available. If you are on a highway shoulder, staying in the vehicle and calling roadside assistance may be safer than attempting a repair.
Look for a nail, screw, or other object in the tread. Do not remove it immediately if the tire still contains air; the object may be slowing the leak. Check the sidewall and shoulder for cuts, bulges, exposed cords, or crushing damage. Any of those conditions rules out a plug repair.
-
Confirm the puncture is repairable (2–5 minutes)
A plug is appropriate only for a small puncture in the repairable tread area. Many tire manufacturers limit puncture repairs to holes no larger than about 1/4 inch, or 6 millimeters, but the tire maker’s instructions take priority. The hole should be reasonably straight through the tread, not a long tear or angled slash.
Do not plug a sidewall, shoulder, bead, or a puncture near another repair. Also avoid repairing a tire that was driven while severely underinflated. Internal damage may not be visible from the outside.
-
Find and mark the leak (3–5 minutes)
If the puncture is not obvious, inflate the tire enough to inspect it safely, staying below the recommended cold pressure until you know the tire is sound. Spray soapy water over the tread, sidewall, valve stem, and bead. A growing cluster of bubbles identifies the leak. Mark the location with chalk or a grease pencil.
If bubbles appear at the valve or bead rather than the tread, a plug will not fix the problem. If the tire will not hold enough air to move the vehicle safely, do not drive it to a repair shop; use a spare or call for assistance.
-
Remove the object (1–2 minutes)
Put on gloves and use pliers to pull out the nail or screw. Pull steadily in line with the puncture instead of twisting aggressively. Expect the tire to lose air quickly. If the object is a large screw, bolt, or piece of metal, stop and have the tire inspected rather than forcing a plug into an oversized hole.
-
Prepare the puncture with the reaming tool (2–4 minutes)
Thread one rubber plug through the eye of the insertion tool according to the kit directions. Set it aside. Apply only the lubricant recommended by the kit, if any.
Insert the rough, file-like reaming tool into the puncture. Push it in and out several times to clean and slightly open the channel. Do not enlarge the hole more than necessary. Excessive reaming can remove too much rubber and make the repair unreliable. Keep the tool aligned with the original channel rather than drilling sideways.
-
Insert the plug (1–3 minutes)
Push the plug-carrying insertion tool into the puncture until roughly half of the plug remains outside the tread, or follow the kit’s specific depth instructions. This may require firm, controlled pressure. Do not hammer the tool or use a sharp object to force it in.
When the plug is seated, pull the insertion tool straight out. The tool’s split eye should release the plug while leaving the rubber in the hole. If the entire plug pulls out, repeat the process with a fresh plug rather than reusing a stretched one.
-
Trim and inflate the tire (5–10 minutes)
Use cutters or a sharp knife to trim the exposed ends close to the tread. Do not cut deeply into the tread blocks. Inflate the tire to the vehicle manufacturer’s recommended cold pressure, commonly somewhere between 30 and 40 psi for passenger vehicles, but always use the doorjamb label for your exact vehicle.
Keep your face and hands away from the valve and tread while inflating. If the tire or plug bulges, hisses loudly, or will not accept air, stop and replace the tire or seek professional help.
-
Check the repair and drive cautiously (10–15 minutes)
Spray the plugged area with soapy water. No new bubbles should appear for several minutes. Recheck the pressure with a gauge. If the pressure drops, the repair is not holding.
If the tire passes the bubble test, drive only as needed to reach a tire shop. Avoid high speeds, long trips, heavy loads, and hard cornering. Recheck pressure after a short drive and again the next morning. A professional should inspect the tire from the inside and install an approved permanent repair as soon as possible.
Mistakes to Avoid
- Plugging a sidewall, shoulder, bead, or visible bulge.
- Using a plug on a puncture larger than the kit or tire manufacturer allows.
- Leaving the screw or nail in place and trying to plug around it.
- Using too much force with the reaming tool or enlarging the channel excessively.
- Combining an incompatible liquid sealant with a plug. Sealants can complicate later inspection and may damage pressure-monitoring sensors.
- Inflating by the maximum sidewall number instead of the vehicle’s recommended pressure.
- Skipping the soapy-water test or assuming a repair is sound because it feels firm.
- Treating a roadside plug as a permanent repair or driving at normal highway speed before inspection.
How Often
Inspect the repaired tire before every drive until a shop completes a permanent repair. Check pressure when the tire is cold after the first short trip, the next morning, and at least monthly thereafter. A pressure-monitoring system is useful, but it does not replace a visual inspection and gauge reading.
Do not repeatedly plug the same puncture. If the plug leaks, loosens, or becomes damaged, stop driving on the tire. A repair shop should remove the tire from the wheel, inspect the inner liner and cords, and determine whether an approved internal patch-and-plug repair is possible.
When to Call a Pro or Replace
Call a professional when the puncture is in the sidewall or shoulder, the hole is larger than about 1/4 inch, the tire has multiple punctures, or the tire was driven while flat or severely low. Professional inspection is also necessary if you see exposed cords, a bulge, a deep cut, bead damage, uneven wear, or signs of internal separation.
Replace the tire if its tread is at or below the legal wear indicators, if it has structural damage, or if the manufacturer’s age and condition guidance calls for replacement. Replace tires in axle pairs when appropriate, and match the replacement’s size, load rating, and speed rating to the vehicle requirements. When in doubt, a temporary plug is not worth risking a loss of control.
FAQ
Can I drive normally after plugging a tire?
No. A string plug should be treated as a temporary repair. Drive cautiously and directly to a tire professional for an internal inspection and approved permanent repair. Avoid extended travel, high speeds, towing, and heavy loads.
How long does a tire plug last?
There is no dependable universal lifespan. A properly installed plug may hold air long enough to reach a shop, but it can also leak soon after installation. The tire’s construction, puncture size, location, inflation pressure, and driving conditions all matter.
Is a plug better than a patch?
A professional combination repair, usually an internal patch and plug installed after removing the tire, is generally more reliable than an exterior string plug. A plug is useful as a temporary roadside measure when the puncture is small and located in the center tread.
Why is my plugged tire still losing air?
The plug may be too small, improperly seated, or installed in an oversized or irregular hole. The leak could also be at the valve stem, bead, wheel, or a second puncture. Stop driving on it, spray the entire tire with soapy water, and have a professional inspect it from the inside.



